A guide on how to run a Quick SEO Audit on your Website
Everyone I mean Everyone wants to learn SEO.
People read blogs, watch videos and begin it up but exactly don't know where to begin from.

Generally, a complete SEO Audit takes hours or it may even take days depending upon the size of the site and its type.

But As time is money and what if you can complete a task of a day in a few hours.

I'm sure you're probably gonna say yes and why not Everyone wants to save time.


Here are a few steps you need to follow to run a quick SEO Audit on your site.


#STEP 1 TO RUN A QUICK SEO AUDIT: Page Speed Insights


Would you prefer to stay on a website that takes minutes to load? NO, right.

Event the google doesn't like such sights that take time to load and therefore Loading speed is important when you talk about optimising it for the search engines.

To check the page speed you simply need to log on to  https://developers.google.com/speed/pagespeed/insights/

Enter your URL see what you've sown in the website.

It shows you results for both desktop and Mobile and also shows the benchmarks

A guide on how to run a Quick SEO Audit on your Website

I took Google as an example and you can see that even the mobile loading speed for Google is 89 which means there is still scope for improvement and the benchmark score for mobile is


  • 0-49: slow
  • 50-89: Average
  • 90-100: Fast


A guide on how to run a Quick SEO Audit on your Website

For desktop Google's speed is fast and the score is 100 which is best.

The benchmark score for desktop is the same as Mobile. 

Remember fastest the loading speed lesser the bounce rate. If a user bounces back even before the sight is loaded it is not a good sign for your site.

I always use page speed insights whenever I run a Quick SEO Audit on the sites I work on.


#Number2: Dead Links/Broken Links:


How often you click on a link and it takes you nowhere or shows Error 404. it happens most of the times with sites which are not properly developed and optimized and google doesn't like such sites. 


The links that take you nowhere or land on Error 404 page are called dead links and broken links. though both are different we will talk about these later someday. 


It is significant for a website that every link redirects you either on a page or a site (depending upon the link and content). 


There are a lot of tools on Google which can be used to check the dead links.


The one which I commonly use for detecting dead links while conducting a Quick SEO Audit is 


What I like about this tool is you can detect dead links of the entire site or maybe just a single page. 

It shows you the total number of links scanned, how many out of the total are okay/working and how many of them are dead or broken. 

A guide on how to run a Quick SEO Audit on your Website


There should be no broken links or dead links at all. A developer has to be very careful while putting and redirecting all the links. 

You can even see the full report of the scan and can check the source where it is linked from and the, of course, the URL. 


#Number 3: CSS Minification Test:

Not talking about the technical things and what is CSS and How does it affect Optimisation I'd prefer to tell you about what happens if CSS is not minified. 

If the CSS of your site is not minified it will result in more loading time. The weight of your CSS is directly proportional to the loading time of your site.

I use SEOsitecheckup for this. though its a paid tool you can run a 1-2 tests for free. 

A guide on how to run a Quick SEO Audit on your Website

The score it shows should be maximum. Here in the image its 51 which is not considered as a good score. 

Every piece of CSS must be minimised for making a site SEO friendly.

#Number 4: Title and Heading Test:

To make a site recognizable for search engines and tell what the site is about it is of paramount importance that one should put heading tags, title, meta title and meta keywords appropriately. 

To check whether the headings and titles have been put or not you can use various free tools and the one which I am currently using is SEO QUAKE. 

By adding this extension to our browser you get to see the detailed diagnosis report of the page/site.

A guide on how to run a Quick SEO Audit on your Website

What you get from this tool?

  • Title: Title is one of the most important things, you need to put on your site.
  • Meta Description: meta description is the content below the title shown on the search engines. It is important to have a good and user-relevant meta description.
  • Headings:  Headings are HTML header tags in which your keywords can be placed.  


A guide on how to run a Quick SEO Audit on your Website

SEO Quake is one of the best tools I've found so far for a QUICK SEO AUDIT


What I find most useful in this tool is that it gives you useful tips for each and everything. 

A guide on how to run a Quick SEO Audit on your Website


Now, all that you need to do is,  hop on to the website you're looking to run a quick SEO audit on and prepare a document for the results and start working on them.


To know more about SEO subscribe to our newsletter.


A GUIDE ON HOW TO RUN A QUICK SEO AUDIT ON YOUR WEBSITE

A GUIDE ON HOW TO RUN A QUICK SEO AUDIT ON YOUR WEBSITE

A guide on how to run a Quick SEO Audit on your Website
Everyone I mean Everyone wants to learn SEO.
People read blogs, watch videos and begin it up but exactly don't know where to begin from.

Generally, a complete SEO Audit takes hours or it may even take days depending upon the size of the site and its type.

But As time is money and what if you can complete a task of a day in a few hours.

I'm sure you're probably gonna say yes and why not Everyone wants to save time.


Here are a few steps you need to follow to run a quick SEO Audit on your site.


#STEP 1 TO RUN A QUICK SEO AUDIT: Page Speed Insights


Would you prefer to stay on a website that takes minutes to load? NO, right.

Event the google doesn't like such sights that take time to load and therefore Loading speed is important when you talk about optimising it for the search engines.

To check the page speed you simply need to log on to  https://developers.google.com/speed/pagespeed/insights/

Enter your URL see what you've sown in the website.

It shows you results for both desktop and Mobile and also shows the benchmarks

A guide on how to run a Quick SEO Audit on your Website

I took Google as an example and you can see that even the mobile loading speed for Google is 89 which means there is still scope for improvement and the benchmark score for mobile is


  • 0-49: slow
  • 50-89: Average
  • 90-100: Fast


A guide on how to run a Quick SEO Audit on your Website

For desktop Google's speed is fast and the score is 100 which is best.

The benchmark score for desktop is the same as Mobile. 

Remember fastest the loading speed lesser the bounce rate. If a user bounces back even before the sight is loaded it is not a good sign for your site.

I always use page speed insights whenever I run a Quick SEO Audit on the sites I work on.


#Number2: Dead Links/Broken Links:


How often you click on a link and it takes you nowhere or shows Error 404. it happens most of the times with sites which are not properly developed and optimized and google doesn't like such sites. 


The links that take you nowhere or land on Error 404 page are called dead links and broken links. though both are different we will talk about these later someday. 


It is significant for a website that every link redirects you either on a page or a site (depending upon the link and content). 


There are a lot of tools on Google which can be used to check the dead links.


The one which I commonly use for detecting dead links while conducting a Quick SEO Audit is 


What I like about this tool is you can detect dead links of the entire site or maybe just a single page. 

It shows you the total number of links scanned, how many out of the total are okay/working and how many of them are dead or broken. 

A guide on how to run a Quick SEO Audit on your Website


There should be no broken links or dead links at all. A developer has to be very careful while putting and redirecting all the links. 

You can even see the full report of the scan and can check the source where it is linked from and the, of course, the URL. 


#Number 3: CSS Minification Test:

Not talking about the technical things and what is CSS and How does it affect Optimisation I'd prefer to tell you about what happens if CSS is not minified. 

If the CSS of your site is not minified it will result in more loading time. The weight of your CSS is directly proportional to the loading time of your site.

I use SEOsitecheckup for this. though its a paid tool you can run a 1-2 tests for free.


A guide on how to run a Quick SEO Audit on your Website

The score it shows should be maximum. Here in the image its 51 which is not considered as a good score. 

Every piece of CSS must be minimised for making a site SEO friendly.

#Number 4: Title and Heading Test:

To make a site recognizable for search engines and tell what the site is about it is of paramount importance that one should put heading tags, title, meta title and meta keywords appropriately. 

To check whether the headings and titles have been put or not you can use various free tools and the one which I am currently using is SEO QUAKE. 

By adding this extension to our browser you get to see the detailed diagnosis report of the page/site.

A guide on how to run a Quick SEO Audit on your Website

What you get from this tool?

  • Title: Title is one of the most important things, you need to put on your site.
  • Meta Description: meta description is the content below the title shown on the search engines. It is important to have a good and user-relevant meta description.
  • Headings:  Headings are HTML header tags in which your keywords can be placed.  


A guide on how to run a Quick SEO Audit on your Website

SEO Quake is one of the best tools I've found so far for a QUICK SEO AUDIT


What I find most useful in this tool is that it gives you useful tips for each and everything. 

A guide on how to run a Quick SEO Audit on your Website


Now, all that you need to do is,  hop on to the website you're looking to run a quick SEO audit on and prepare a document for the results and start working on them.


To know more about SEO subscribe to our newsletter.


Top Free Keyword Reaserch Tools of 2019

Top Free Keyword Reaserch Tools of 2019


Top Free Keyword Reaserch Tools of 2019
Keyword research is the foundation stone of any successful digital marketing campaign. If you've succeeded in identifying the correct keywords then for sure your campaign will prove out to be a huge success.

Building a strategy around the keyword you wish to rank for is vital, and there are plenty of SEO keyword tools to help you with that.

Everyone wants traffic on their blog and if you're a blogger then keyword research must be the first step in your writing process. 

So here I've listed the best Keyword research tools which will help you rank your blog on the top.


1. Google Keyword Planner:  

Google keyword planner is one of the best free tools for keyword research and is a part of Google Adwords platform. 

Firstly you need to login into Google adwords and then click on tools and you'll find Keyword planner over there.

What is good about this keyword research tool is that you can choose the location for the keywords,(where the keywords are being researched ) 

and the idea filter. Keyword planner gives you two options 

1 Closely Related Ideas 

2 Broadly Related Ideas 


This tool is mostly used by new SEOs or the people having basic knowledge of the SEO.


2. Uber Suggest:

This free tool has been provided by the famous digital marketer Niel Patel.

what's different about this tool is that you can type in your competitor's domain name to know what keywords he is using to rank his site. 

You need to type in the word (keyword) and then select the region you wish to see results for and you will get the results for 

              Search Volume
               
              SEO Difficulty
               
              Paid Difficulty
              
              Cost Per Click 


and it even shows you the percentage of chance of your ranking in the top 10 or 20 SERP (Search Engine Result Page)


It also shows you keyword ideas that you might be interested in using along with their volume CPC, Paid Difficulty and SEO Difficulty. 


3.Keywords Everywhere:

One of the best free tools used by professional SEOs. Why? Simply Doesn't matter wherever you are it is along with you. 

Keywords Everywhere is a free extension for Both Google Chrome and Mozilla Firefox. With this tool, you need not to open a separate window for keyword research, just move your mouse cursor to the top right of your chrome (because I use Chrome) and do your keyword research. 

What's special about this tool is it shows you the results for what other people are searching.

4. Soovle:

Soovle is also a great tool for keyword research. It fetches you results from Google, Yahoo, Bing, Youtube, Amazon and many more. 

One can drag the results to save them and later download them in a CSV format. 


10 Best Cool Facebook Tricks Every Facebook User Should Know

10 Best Cool Facebook Tricks Every Facebook User Should Know

10 Best Cool Facebook Tricks Every Facebook User Should Know

https://www.technosam.site/2019/03/10-best-cool-facebook-tricks-every.html

Facebook is the most popular social media platform out there and even though many other social media platforms have risen in the past couple of years to challenge its authority, Facebook has retained its numero uno position. You might love it or hate it but chances are, you use it a lot and that means, a few tricks should always come in handy. I love these tricks as not only they allow me to get the most out of my Facebook account, but they also allow me to do some pretty cool things which I love. So, if you also want to make the most of your Facebook, here are the 10 best Facebook tricks that you should know about.


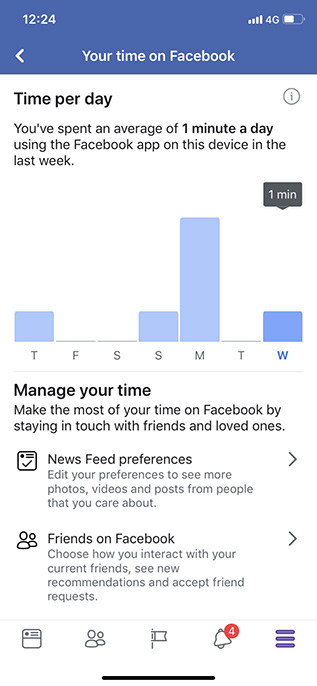
1. Check How Much Time You Spend on Facebook

If you’re concerned with how much time you’re spending on Facebook, you’ll be glad to know that instead of relying on third party apps, or waiting for your phone to get Digital Wellbeing or Screen Time features, you can use the Facebook app to check how much time you’re spending on it. Facebook shows a handy bar graph of your usage of the app over the last week along with your average usage time.
10 Best Cool Facebook Tricks Every Facebook User Should Know


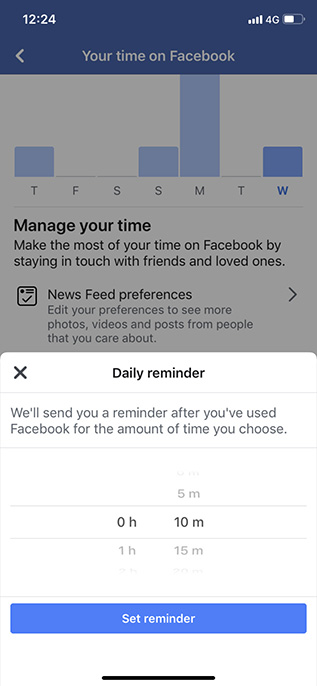
2. Limit Your Facebook Usage


If you used the last trick to figure out how much time you’re spending on Facebook and were surprised to see a very high number there, well, rest easy because you can try and limit your usage of Facebook as well. There are a bunch of ways to do that actually.
From the Facebook App:
Where you see the time you’re spending on Facebook, there’s an option to set a reminder after which the app will inform you that you’ve spent enough time on Facebook. That can be handy, but it can also be easily bypassed.
10 Best Cool Facebook Tricks Every Facebook User Should Know
Use Digital Wellbeing or Screen Time to Limit Facebook Usage:
If you want to implement a more strict time limit on your Facebook usage, you can use either Screen Time (if you’re on iOS), or Digital Wellbeing (if you’re on a supported Android Pie device) to do this. Both of these features allow users to set time limits on specific apps which should definitely help you limit your Facebook usage.

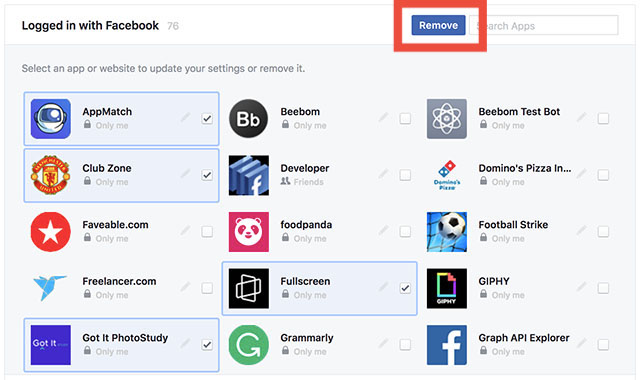
3. Bulk Delete Third Party Apps from Your Account

A lot of websites, online games, and apps offer the ability to log in with your Facebook account, and while you may have done that a bunch of times without putting too much thought into it, if you’re worried about such apps stealing or misusing your data, well you can delete them from your account. What’s better is that you don’t have to delete every app individually; you can actually select all the third party apps you want to delete, and get rid of them in a single click. It’s pretty easy and you can check out our article on bulk deleting third party apps from a Facebook account if you need help.
10 Best Cool Facebook Tricks Every Facebook User Should Know

4. Control Notifications Like a Pro (Android Only)


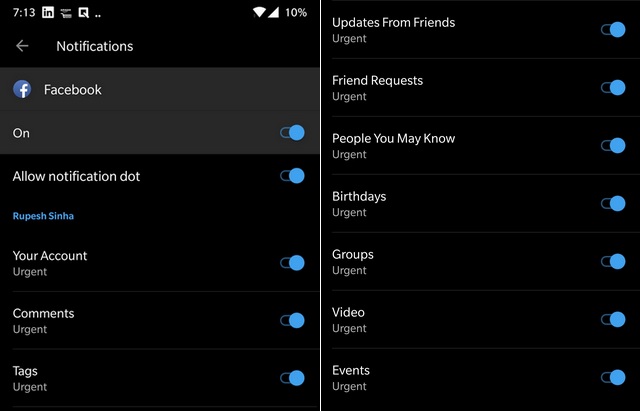
With Android Oreo, Google started rolling out Notification Categories allowing app developers to put more notification controls in the hands of the users. Facebook adopted this back in August and if you’re using an Android phone running Oreo or higher, you can make use of these notification categories to control what kind of Facebook notifications you receive and even control their priorities. There are notification categories for birthdays, people you may know, groups, videos, and a lot more.

10 Best Cool Facebook Tricks Every Facebook User Should Know

5. Find All the Photos Liked by You and Your Friends

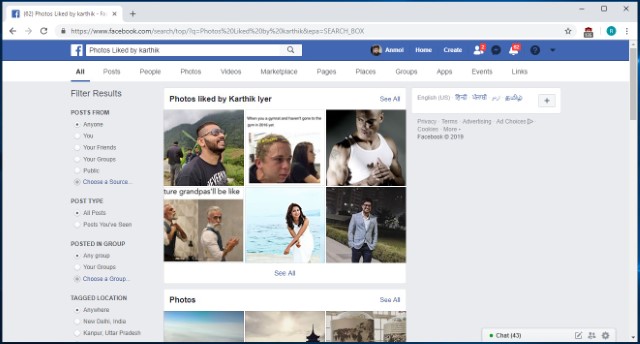
This is a fun nifty Facebook trick that not many people know about. Basically, this feature allows users to see which pictures they have liked in the past. In fact, you can even use this feature to see which photos your friends have liked. The best part is that the trick is pretty easy to execute. Just click on the search bar at the top and type in “Photos Liked by” followed by either “me” or the “name of your friend”. For example, in the picture below, I have searched for “Photos liked by Karthik”, and Facebook is showing me the collection of photos that Karthik has liked.

10 Best Cool Facebook Tricks Every Facebook User Should Know

6. Re-watch the Content that You Missed by Accidental Refresh


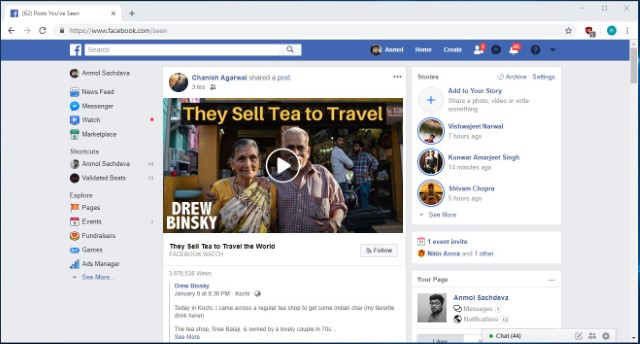
I don’t know how many times I have accidentally refreshed my Facebook feed only to curse myself later as the post that I was looking at was lost. Well, with this trick, you will be able to see the feeds that you have lost due to any accidental refresh. When we accidentally refresh our Facebook feed, Facebook considers that the current feed is already consumed by you and marks it as seen. You can access this feed by going to Facebook and adding “/seen” at the end of the normal URL. So basically you can simply visit the “www.facebook.com/seen” URL to see the content that you have missed.

10 Best Cool Facebook Tricks Every Facebook User Should Know

7. Download your Facebook data

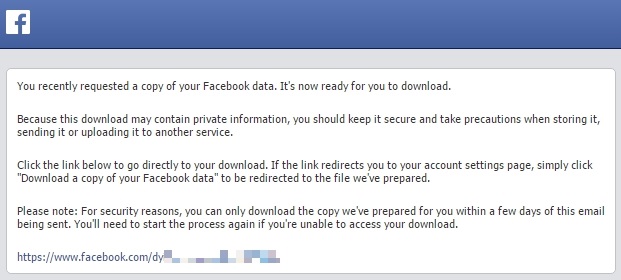
If you have been using Facebook for a number of years now, your account must pack-in tons of your personal data like photos, videos, posts, messages, info and more. And the good thing is Facebook lets you download all of your profile data.
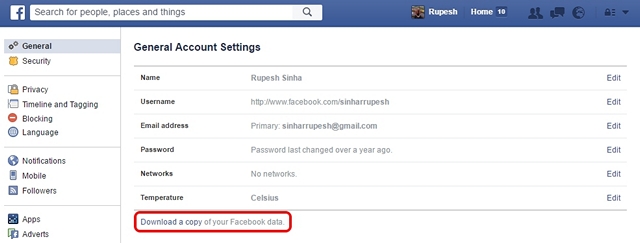
To do it, just head over to Facebook Settings and in the “General” tab, you should see an option at the bottom saying “Download a copy of your Facebook data“.
10 Best Cool Facebook Tricks Every Facebook User Should Know

Then, click “Start My Archive“, after which Facebook will prompt you to enter your password again, as a security measure. Facebook will then gather all your data and send you an email once the download is ready.
10 Best Cool Facebook Tricks Every Facebook User Should Know

8. Watch Facebook Videos With Your Friends

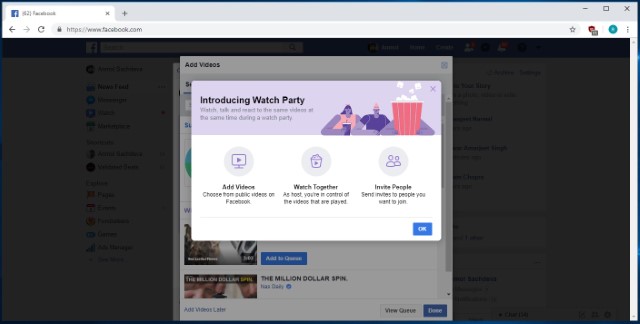
Facebook Watch Party is a new feature from the social media giant which aims at bringing collaborative viewing for distant friends. The feature basically allows users to create a watch party group, where all the members will be able to watch any public videos on Facebook in real time. There are various ways to create a watch party, with the easiest being from your home page. Just click on the “create a post” area and then click on the three-dot menu. From here, click on the “Watch Party” button and follow on the on-screen instructions to invite the friends that you want to watch videos with. It’s a cool way to enjoy your favorite videos with friends and I kind of love it.

10 Best Cool Facebook Tricks Every Facebook User Should Know


9. Search for Open Jobs in Your Area


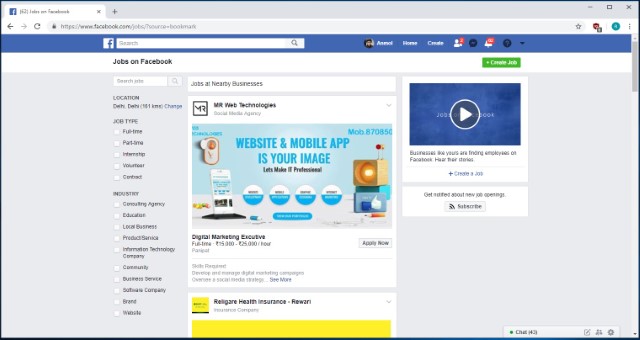
Slowly and slowly, Facebook is trying to branch away from just being a social media platform as it is starting to offer more and more services. One of those new services is the ability to look for open jobs in your area. The number of people who are looking for and getting jobs from Facebook is increasing year over year and you should not miss this train. The “Jobs” page is hosted under the “Explore” section of Facebook (Click on the “See More” button if you don’t see it), and you can click on it to see jobs posted in your area. While this feature is still in its starting stage, you can find some quality job postings here.

10 Best Cool Facebook Tricks Every Facebook User Should Know

10. Create Fund-Raising Programs


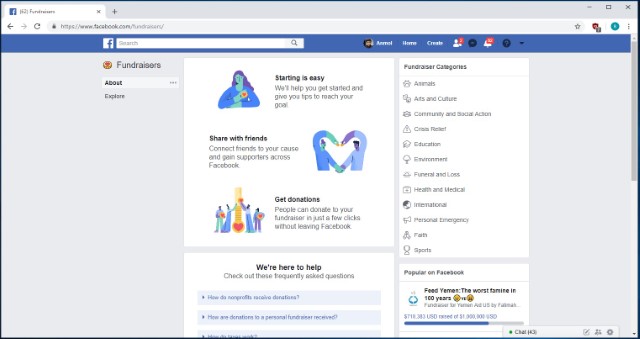
This trick is one of the newest additions to Facebook and it is for a good cause. The feature basically allows users to start fund-raising campaigns and donate to other programs if they want to. The option to create a fund-raising program can be found under the “Explore” section as “Fundraisers“. Once you click on this option, you will be taken to the fund-raiser page where you will be given step-by-step directions to create your fundraiser program. Here, you will also find the links to programs that are already running so that you can donate to them if you agree with the cause.
10 Best Cool Facebook Tricks Every Facebook User Should Know
https://www.technosam.site/2019/03/10-best-cool-facebook-tricks-every.html


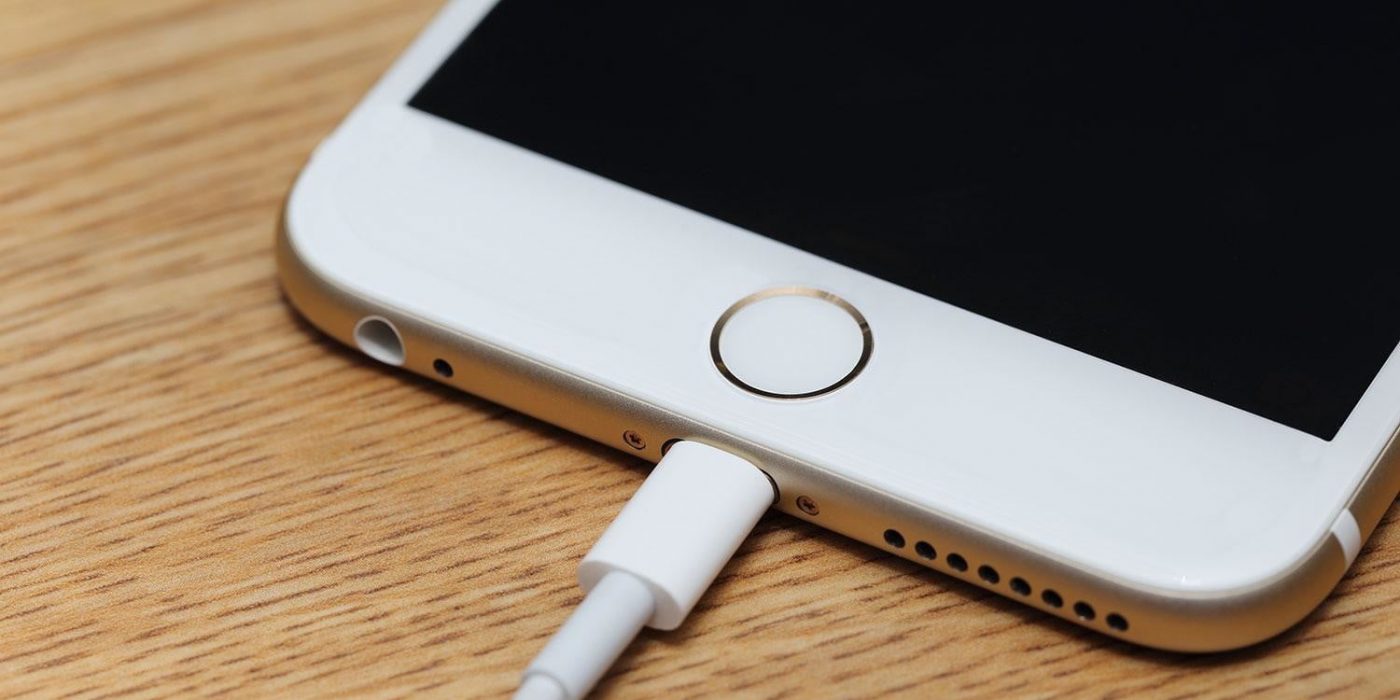
Slow Phone Charging?  Here is the reason why

Slow Phone Charging? Here is the reason why


My phone is charging slow. What should I do? | UnlockUnit
Is your Samsung Galaxy charging slowly? Your iPhone 6 or Note 5 doesn't charge up as fast as it used to? The truth is, whether you have Samsung or an LG, Huawei or a Xiaomi, this problem affects every smartphone after some time, and usually for the same reasons. In this article, we'll show you why your smartphone charges slowly, and what you can do about it.


You know the deal: hot date lined up for tonight, got home late from work, no chance of your battery lasting all night and only 15 minutes to charge. Yet, your battery always seems to take so much longer to charge than everyone else's, so you know that won't be enough. What's the deal? Why is your battery always slow to charge? Here are the main culprits and what you can do about them.


Suspect number one - your cable


The first offender in any case of slow charging should always be your USB cable. Just take a look at it: guilty as hell. Considering the awful treatment my USB cables undergo, it's no wonder that it is usually why my phone won't charge faster.


USB cables get bent, twisted, coiled, run over with chair wheels and generally abused: all of these are not very good for maintaining a solid connection and flow-through of power. Be sure to check the ends too: they can very easily get full of fluff.

Cables aren't immune to physical wear and tear and the USB connector itself also gets worn and can feel loose when you plug in your phone. If the cable that came packaged with your device isn't reliable anymore or you've simply lost it, beware of buying the cheapest charging options online. Higher quality cables have copper wire (some cheapos use aluminum and other substitutes that don't hold up as well) and thicker rubber enamel around the wire, making it more resistant to damage.


Suspect 2: the power source


The next obvious question is where are you getting your power from? If you have a USB cable plugged into your laptop then your phone is going to charge insanely slowly and you'll deserve it. Likewise with Qi wireless charging, which we know from newer flagships like the Samsung Galaxy S9, Sony Xperia XZ2, Pixel 3, and LG G7. While Qi is a brilliant technology, that brilliance comes at the cost of speed.

Your best bet is to have your phone plugged directly into mains power at the wall socket. However, even this can be problematic, especially if you're in an old building where the wiring might be a little sketchy. If you think this could be the problem, move to another outlet (and then call an electrician).


Suspect 3: the charger may not be right


To complete the trifecta, if it's not your power source or your cable, chances are that it's the actual adapter you're using that is causing your battery to charge slowly. There's a reason every manufacturer provides a specific USB adapter for each phone they ship.

Switching adapters between phones can mix-match voltage, wattage, amperage and so on. This is why it's best to stick with the adapter that came with your phone or at the very least take a look at the fine print and replace it with another adapter of the same type.


Suspect 4: your phone itself


Sorry, but it's true. If you're sitting there wondering why your Galaxy S2 takes so long to charge it's probably because the old-timer is getting worn out after many years of use. Newer processors not only support fast charging, but newer phones even come with turbo charging chargers. The Galaxy S6, for example, can get your four hours' worth of usage after just ten minutes plugged in.

Other phones that support fast charging will have a lightning bolt icon on the charger itself, possibly along with turbo charging output figures. Your phone can also become a pocket lint cave too, so check your microUSB port and make sure the little flap in the port isn't bent while you're looking in there. Your battery might just be kaput too, so ask yourself how old it is. At least one advantage of older phones is the removable battery, so if you can pop it out, consider replacing it if it can never seem to charge normally.

At the end of the day, entropy bring a slow but sure end to all things. If your phone is ancient, it's time to accept that it's past its prime.


Suspect 5: it's...you?


It's true - you're the worst thing preventing your phone charging quickly when you can't keep your hands off it. Seriously, if time is of the essence, your best bet is to leave it alone. Mindlessly scrolling through your Insta feed while watching your battery percentage go nowhere is no one's fault but your own.

So leave your phone alone when you charge it, turn your Wi-Fi/data/Bluetooth off or better yet, turn it off entirely. That's actually the absolute best way to charge a phone quickly: turn it off, plug it into a wall with the original charger and take a little break from your digital life (or go to your computer, if you must). Even after as little as 15 minutes.
How to fix 'Unfortunately app has stopped' errors

How to fix 'Unfortunately app has stopped' errors


How to fix 'Unfortunately app has stopped' errors
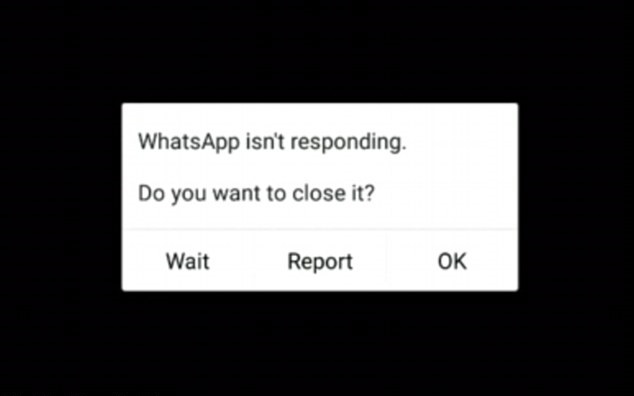
Do you get the following message when an app crashes? Unfortunately, YouTube has stopped, unfortunately, Facebook has stopped, or unfortunately, WhatsApp has stopped? Actually the particular app doesn't matter, any app can suffer from this misfortune and give a similar message. But there are ways to solve it. Here's how to fix Unfortunately, app has stopped errors.


Jump to solution:

Clear out the app's storage
Check the SD card
Uninstall and reinstall the app
Turn it off and on again
Last resort: do a factory reset


Clear out the app's storage


This problem often arises with the contacts, gallery and launcher apps. The procedure to fix this is generally always the same.


  • First, go to Settings on your device.
  • Apps and Notifications then App info
  • Scroll down to the app that's causing problems and tap on it.
  • In the next menu, hit Storage
  • Here you will find the Clear data and Clear cache options.

Clear cache is the option you should start with. It will get rid of saved data that allows apps to load a little quicker when you launch them. Clearing it means the app will open a little slower, but your main problem might well be solved.

Clear data will erase all the app's data, including files, settings and accounts, so don't use this unless you have to.


Check the SD card


Thanks to Paul in our comments section who pointed out that this error can also relate to a corrupted memory card. If the memory card corrupted, then any apps that write to the memory card will suffer this kind of error.

To check this, simply remove the memory card and launch the app that has stopped working. If it works, then you have your culprit. If this turns out to be the case, you'll need a new memory card, but you should still be able to transfer the data from your memory card to your PC as a backup.

Of course, if you don't use an SD card, then skip ahead to the next step.


Uninstall and reinstall the app


If the app isn't built-in, you can also try uninstalling it and then reinstalling it from the Google Play Store. Simply open the Play Store app, open the menu bar on the left-hand side and tap on My apps and games. Find the app in question and hit Uninstall, which takes a few seconds. Afterwards, you can install it again.


Turn it off and on again


You can also try doing a soft reset, which simply means restarting your device. This is super simple and quite effective if your phone has been on for a long time. A soft reset will power cycle your phone, turning it off and then back on again.

It’s a good idea to turn your phone off every few days for a few minutes – this will help a sluggish phone with a variety of issues, whether they're related to the app, network, audio or email.


Last resort: do a factory reset


When the above solutions have failed, you can resort to factory resetting your phone. When doing a factory reset, ensure that you have backed up all of your data beforehand. I repeat: back up all of your data first. A factory reset will wipe your device and set it back to factory defaults, taking everything, including any bugs, with it. You can restore your apps and data afterwards easily, as long as you've made a backup.

In the case of Google Play itself not working, the solution is a little more extensive: delete the cache as a first step and if this doesn't clear things up, clear your data, and finally uninstall any Play Store updates. The same steps apply to Google Play Services, but try them one by one – you don't want to lose all your Play Store preferences for no reason.


8 important whatsapp tricks you should know: Take a Look

8 important whatsapp tricks you should know: Take a Look


WhatsApp is the world’s most popular instant messaging app, and for good reason — it gets a steady stream of updates, has a long list of features, and supports a wide range of devices. There’s little wonder why it’s hit the billion user mark. Want to get the most out of the platform? We’ve got a few essential WhatsApp tricks you should use.


1. How to create bold, italicized, or strikethrough text


It’s been around for a while now, but you’d be surprised how many people don’t know about this neat WhatsApp trick.


Simply put an asterisk (*) at the beginning and end of the desired word or sentence and you can make it bold. So if you’d like to bold the word biscuit, you’ll need to type *biscuit*. The same goes for italics, only with an underscore (_) on either side of the desired text instead. To strike through text, you’ll need to add a tilde (~) to the beginning and end of the desired passage. There’s also an option to create monospace text, by adding three grave accents (“`) to either side of the text.


Want an easier way to do all this? Then highlight the word or passage in question, tap “more” and choose from bold, italicize, strikethrough, or monospace. This doesn’t work on all devices though, so you might have to do the long way.


2. Quote a message in your response


Whether your texting pace is just too fast or a group chat constantly sees new messages, quoting is one of the best WhatsApp tricks to manage context.


To quote someone, you’ll want to hold down on the desired message, then tap the arrow icon that points to the left (it’s the first arrow that appears on top). From here, you can compose your response with the quoted message attached for all to see.


3 Stop auto-downloading via mobile data


One of our favorite WhatsApp tricks can actually help you save some precious mobile data.


There are a few ways to save data in WhatsApp while still receiving notifications and messages. First, disable the app’s ability to download media on mobile data. This is done via Settings > Data and storage usage > When using mobile data.


From this section, you can check or uncheck the downloading of photos, audio, videos and documents via mobile data. This way, you need to tap on the file to actually download it. Videos, in particular, are huge data hogs, so we’d recommend leaving this unchecked.


4 WhatsApp calls eating data? Try this


WhatsApp calls are a handy feature on the platform, but they can consume a fair bit of mobile data if you’re a heavy user or on a limited plan. Thankfully we know of more WhatsApp tricks for improving data consumption. If you’d like to save some bandwidth, try visiting Settings > Data and storage usage > Low data usage and tick the box to lower the amount of data used in a call.


5 Add a contact to your home screen

WhatsApp also lets you add contacts to your homescreen — ideal for significant others and other frequently contacted people.


To add a chat to your phone’s homescreen, open the contact or group in question, then tap the three dot menu in the top right corner. From here, visit More > Add shortcut. You then simply tap “add” to confirm the decision.


6 How to use live location tracking


Sending a location pin is pretty simple in WhatsApp, as you tap the paper clip icon in the message field and choose “location.” But what if you want someone to track your movement in real-time, such as your partner or parent? Fortunately, this is indeed a thing, being one of the best WhatsApp tricks for parents and people with helicopter parents.


You can do this by tapping the paper clip icon once again. From here, tap Location > Share Live location, and specify a period of time to be tracked, ranging from 15 minutes to eight hours. Don’t worry, you can manually end location tracking yourself.


7 Use WhatsApp on your PC


If you prefer a full-size keyboard or just like the convenience of the big screen, WhatsApp Web is one of the best features for you.


To get things started, visit web.whatsapp.com on your computer. The website will display a QR code, which can read on the WhatsApp mobile app. On your phone, tap the three dot menu in the top right corner, then select “WhatsApp Web” to launch the QR code reader. Now, scan the website’s QR code via your phone’s QR code reader and that’s it.


The biggest downside to WhatsApp Web is that it’s completely tethered to your phone. You can’t access it via your PC at work if you left your phone at home. Nevertheless, it’s still a better option than nothing.


8 Sign up for beta access


To get new features first, you’ll need to join the beta program. This also means you run the risk of encountering bugs and other flaws, so do keep that in mind.


To sign up for beta access, visit the WhatsApp page on the Google Play Store and scroll down to the “become a beta tester” section at the bottom. Tap the “I’m in” button and you will then be enrolled in the beta program. Updating to the beta version works just like a regular Play Store app update, as you simply tap the “update” button to get the bleeding-edge version of the app.


If you’d like to leave the beta, you can do so at any time by tapping the “leave” button that replaces “I’m in,”