How to Disable Copying Text On Blogger Blogs?

How to Disable Copying Text On Blogger Blogs?

How to Disable Copying Text On Blogger Blogs?
Today, I would like my visitors to learn how to protect (Disable Copying Text) your hard work spend in creating and writing fresh articles on your website or blog by being stolen by some others.

Copying the writing from your website and placing it elsewhere is common on the net. There are sites which often doesn’t make it possible for us to copy the content on the web pages. The content function is disabled from the site through the site admin so that you can protect the website. We might find how to implement an identical methodology pertaining to Blogger. This key is valid for almost any sites. This trick will probably disable (Ctrl+A) function to your site.
Sometimes the trick may not be compatible with some old browsers. But, we will see how to make things more secure in my future posts.


Steps to implement to Blogger (Disable Copying Text):

 
1. Go to Dashboard > Select the blog where you would like to implement the code


2. Go to Layout > Add a Gadget > Select “HTML/JavaScript gadget”


3. Paste the following code in the box:


<script src='demo-to-prevent-copy-paste-on-blogger_files/googleapis.js'></script>
<script type='text/javascript'>
if (typeof document.onselectstart!="undefined" ) {
document.onselectstart=new Function ("return false" );
} else {
document.onmousedown=new Function ("return false" ); document.onmouseup=new Function ("return true" );
}
</script>

4. You are done!!! Check out how it works.

Note: The above code can also be placed between <head> & </head>
 

Final Words: 

So that’s the small and effective trick to protect your content from copycats. Soon we will write more articles to protect your content so Stay Tuned! Share this post with your friends and drop your views in comments till then Peace, Blessings and Happy Blessings.
How To Remove Sora Templates Attribution Credit Without Redirecting

How To Remove Sora Templates Attribution Credit Without Redirecting

How To Remove Sora Templates Attribution Credit Without Redirecting


Sora templates are one of the best blogger templates you can get for a cheap price or for free. It comes highly optimized, build with HTML5, mobile responsive and intuitive interface. Each Sora template comes with two option, either to download it for free and use it with the attribution link or to purchase it for a very cheap price.
If you are low on budget and looking to use Sora template for your new blog without purchasing it and without having Sora attribution link in your blog, This tutorial will teach you how you can overcome this problem. Most people try to remove this attribution credit from the HTML view of their blog but found their blog being redirected to another page, This article will help you to remove the attribution link from all free Sora templates without redirecting to another page.
Note: Make sure to backup your templates in case something goes wrong, you can easily go to the backup.
Follow the technique below exactly to remove the attribute/credits easily
First Step:

Log in to your Blogger dashboard and click on "Templates" then click on "Edit HTML"
Click anywhere inside the HTML codes and Press "CNTRL F" on your computer to open a finder (search) box
Search for "<script type='text/javascript'>" in your HTML code
Under this code, you will find the following line (in the picture)


disable-soratemplates-attribution-credit


if you didn't find this code ( in some templates ) then try this one :

<script async='async' type='text/javascript'>

Second Step:


Delete from "<script type='text/javascript'>" all the way down to </script>
Next Find </head> and paste the codes below before it 
Paste the following codes before </head>

<script  type='text/javascript'>
var thumbnail_mode = &quot;no-float&quot; ;
summary_noimg = 400;  /* Summary length if no image*/
summary_img = 300; /* Summary length with image*/
img_thumb_height = 200; /*Image Height*/
img_thumb_width = 200; /*Image Width*/
</script><script src='http://netoopscodes.googlecode.com/svn/branches/Js%20files/auto-readmore-blogger.js' type='text/javascript'/>
We are almost done, the next step is to change the id of the template to your liking.
Press "CNTRL F" to recall the search bar and type in "id='mycontent'>" to search for it.
Replace "mycontent" with anything you want and you can now go ahead and replace the Sora attribution credit link with whatever you want, maybe the name of your blog.
When you are done, click on Save Template to make the changes live.
How to Put AdSense Inside Blogger Post – Advanced Practices

How to Put AdSense Inside Blogger Post – Advanced Practices

Image result for How to Put AdSense Inside Blogger Post
Google AdSense is the best way to earn revenue through your blog. For this purpose placement of ads on right place is very important where coverage is maximum. In this post, we will discuss advanced practices to display ads at the right place to generate high revenue from your blog and give worth to your writing skill. There are two places in a post where there is high coverage of an ad unit. Coverage of ad unit means clear visibility to readers and more chances of getting clicks. One of the most important location is just below post title/ start of the post and other is middle of the post. In this article, we will also discuss how to put AdSense inside Blogger post only. Ads on the Blogger Static Pages will not appear.

Put Google AdSense in middle of post

Table of Contents  hide
Most recent version here –
Display AdSense Inside Blogger Post Automatically
Put AdSense in the Middle of Blogger Post
Most recent version here –
Learn How to Put AdSense Ads After Certain Paragraph
Display AdSense Inside Blogger Post Automatically
Hereunder is a script that will show ads at the start and middle of the post automatically. This script finds the middle part of the blog post and automatically place an ad. For some blog like tech blogs where HTML code sharing is common will not work perfectly it might come between shared code. But on all other blogs, it will work perfectly.

This code is also for those who are using scripts to show the post excerpt on their home page.


CASE-I: For those who are using post excerpt on the home page.
To use this script go to theme HTML and search for <data:post.body/> and replace this code with the following code, and hit the save button.

CASE-II: For those who are using default Blogger theme i.e. no post excerpt on the home page.
To use this script go to theme HTML and search for <data:post.body/> and replace this code with the following code,

<b:if cond='data:blog.pageType == &quot;index&quot;'>
<data:post.body/>
</b:if>
Now paste the following code just above it, and hit the save button.

<!-- Ads in mid of post: automatically -->
<b:if cond='data:blog.pageType == &quot;item&quot;'>
<div expr:id='"atmid" + data:post.id'/>
<div style="clear:both; margin:10px 0;text-align:center">
<!-- Paste Ad code here: Appear at mid of the post -->
</div>
<div expr:id='"attop" + data:post.id'>
<div style="clear:both; margin:10px 0;text-align:center">
<!-- Paste Ad code here: Appear at top of the post -->
</div>
<data:post.body/>
<div style="clear:both; margin:10px 0;text-align:center">
<!-- Paste Ad code here: Appear at bottom of the post -->
</div>
</div>
</b:if>

<script type="text/javascript">
var obj0=document.getElementById("atmid<data:post.id/>");
var obj1=document.getElementById("attop<data:post.id/>");
var s=obj1.innerHTML;
var t=s.substr(0,s.length/2);
var r=t.lastIndexOf(" ");
if(r>0) {obj0.innerHTML=s.substr(0,r);obj1.innerHTML=s.substr(r+1);}
</script>
<!-- Ads in mid of post: automatically -->
If you want to display ads on certain posts, you can use post label to control ads visibility. The following script may work for you.

To use this script go to theme HTML and search for <data:post.body/> and replace this code with the following code, and save the changes.

<!-- Ads in mid of post: automatically -->
<b:if cond='data:blog.pageType == &quot;item&quot;'>
<div expr:id='"atmid" + data:post.id'/>
<b:loop values='data:post.labels' var='label'>
<b:if cond='data:label.name == &quot;Label-Name&quot;'>
<div style="clear:both; margin:10px 0;text-align:center">
<!-- Paste Ad code here: Appear at mid of the post -->
</div>
</b:if>
</b:loop>
<div expr:id='"attop" + data:post.id'>
<b:loop values='data:post.labels' var='label'>
<b:if cond='data:label.name == &quot;Label-Name&quot;'>
<div style="clear:both; margin:10px 0;text-align:center">
<!-- Paste Ad code here: Appear at top of the post -->
</div>
</b:if>
</b:loop>
<data:post.body/>
<b:loop values='data:post.labels' var='label'>
<b:if cond='data:label.name == &quot;Label-Name&quot;'>
<div style="clear:both; margin:10px 0;text-align:center">
<!-- Paste Ad code here: Appear at bottom of the post -->
</div>
</b:if>
</b:loop>
</div>
</b:if>

<script type="text/javascript">
var obj0=document.getElementById("atmid<data:post.id/>");
var obj1=document.getElementById("attop<data:post.id/>");
var s=obj1.innerHTML;
var t=s.substr(0,s.length/2);
var r=t.lastIndexOf(" ");
if(r>0) {obj0.innerHTML=s.substr(0,r);obj1.innerHTML=s.substr(r+1);}
</script>
<!-- Ads in mid of post: automatically -->
Notes –
1. You can use three different labels for three different ads at top, mid and bottom of the post. Must change value Label-Name with actual Label of your post.
2. Must change following three values with your three different/same ad code.
<!– Paste Ad code here: Appear at top of the post –>
<!– Paste Ad code here: Appear at mid of the post –>
<!– Paste Ad code here: Appear at bottom of the post –>

Put AdSense in the Middle of Blogger Post
If you want to place an ad at the custom location in between post, then there is also a solution for you. You have to place <– ads –> tag where you want to show the ad i.e. at the custom location in between your every post.

To use this script go to theme HTML and search for <data:post.body/> and replace this code with the following code, and save the changes.

<!-- Ads in mid of post: automatically -->
<b:if cond='data:blog.pageType == &quot;item&quot;'>
<div expr:id='"atmid" + data:post.id'/>
<div style="clear:both; margin:10px 0;text-align:center">
<!-- Paste Ad code here: Appear at mid of the post -->
</div>
<div expr:id='"attop" + data:post.id'>
<div style="clear:both; margin:10px 0;text-align:center">
<!-- Paste Ad code here: Appear at top of the post -->
</div>
<data:post.body/>
<div style="clear:both; margin:10px 0;text-align:center">
<!-- Paste Ad code here: Appear at bottom of the post -->
</div>
</div>
</b:if>

<script type="text/javascript">
var obj0=document.getElementById("atmid<data:post.id/>");
var obj1=document.getElementById("attop<data:post.id/>");
var s=obj1.innerHTML;
var r=s.search(/x3C!-- ads --x3E/igm);
if(r&gt;0) {obj0.innerHTML=s.substr(0,r);obj1.innerHTML=s.substr(r+13);}
</script>
<!-- Ads in mid of post: automatically -->
Same as I explained above if you want to display ads on certain posts, you can use post label to control ads visibility. The following script may work for you.

If you want to place an ad at the custom location in between post, then there is also a solution for you. You have to place <– ads –> tag where you want to show the AdSense inside Blogger post.

To use this script go to Theme HTML and search for <data:post.body/> and replace this code with the following code, and save the changes.

<!-- Ads in mid of post: automatically -->
<b:if cond='data:blog.pageType == &quot;item&quot;'>
<div expr:id='"atmid" + data:post.id'/>
<b:loop values='data:post.labels' var='label'>
<b:if cond='data:label.name == &quot;Label-Name&quot;'>
<div style="clear:both; margin:10px 0;text-align:center">
<!-- Paste Ad code here: Appear at mid of the post -->
</div>
</b:if>
</b:loop>
<div expr:id='"attop" + data:post.id'>
<b:loop values='data:post.labels' var='label'>
<b:if cond='data:label.name == &quot;Label-Name&quot;'>
<div style="clear:both; margin:10px 0;text-align:center">
<!-- Paste Ad code here: Appear at top of the post -->
</div>
</b:if>
</b:loop>
<data:post.body/>
<b:loop values='data:post.labels' var='label'>
<b:if cond='data:label.name == &quot;Label-Name&quot;'>
<div style="clear:both; margin:10px 0;text-align:center">
<!-- Paste Ad code here: Appear at bottom of the post -->
</div>
</b:if>
</b:loop>
</div>
</b:if>

<script type="text/javascript">
var obj0=document.getElementById("atmid<data:post.id/>");
var obj1=document.getElementById("attop<data:post.id/>");
var s=obj1.innerHTML;
var r=s.search(/x3C!-- ads --x3E/igm);
if(r&gt;0) {obj0.innerHTML=s.substr(0,r);obj1.innerHTML=s.substr(r+13);}
</script>
<!-- Ads in mid of post: automatically -->
Notes –
1. You can use three different labels for three different ads at top, mid and bottom of the post. Must change value Label-Name with actual Label of your post.
2. Must change following three values with your three different/same ad code.
<!– Paste Ad code here: Appear at top of the post –>
<!– Paste Ad code here: Appear at mid of the post –>
<!– Paste Ad code here: Appear at bottom of the post –>
3. Add <– ads –> tag tag in each post in HTML mode.

Important: Before adding/injecting AdSense or some other ad codes in a Blogger theme, you have to Parse it otherwise it will not appear in the posts. To parse AdSense code you can use our AdSense code parser code.
AdNow Review: Scam or Legit, Rates

AdNow Review: Scam or Legit, Rates

Is Adnow a scam? Do they pay well to their publishers? Today I am going to introduce you a new ad network ( native ad network called Adnow. Let’s see Adnow review and find out is this a scam or legit network.

What is Adnow?


Adnow is a native advertising network which is founded in 2014. It is very similar to Taboola and Outbrain. I have found that they faced many problems in getting development. But finally, they got some huge popularity. They said that they have competitive prices and good support for the publishers.

Signup and approval


To get started with Adnow, directly go to their publisher signup page and fill out all the details and verify the E-mail to access your dashboard.

After logging in to your dashboard, add your website and wait for 24-48 hours to get an E-mail from regarding approval or rejection. If you are approved by them, you can create and tags and start making money.


Ad Formats

Adnow is only a native ad network and they pay on CPM and CPC basis. Even though their CPM is low in some countries, their CPC is very good, according to some user reports. 99℅ of native ad networks never offer CPM ads to their publishers, so you need to get clicks to make money. But the CPC rates of native ad networks including Adnow are higher. But when compared to high-quality native ad networks like Taboola, Outbrain, Adnow pays lower.

Payments


The Min.payout is $20 and they pay on NET 7 basis. They pay via Paypal, bank wire etc.

The minimum payout is really easy to reach If you get some good amount of clicks.

Name: AdNow

Alexa rank: 57,094 (Worldwide), Check out the Alexa rank.

Ad formats: Native ads ( CPM, CPC basis )

Min.payout : $20

Payment methods: Paypal, Bank wire

Here are some proofs to prove Adnow is not a scam:

Payment Proof

Payment Proof


Conclusion

This is the Adnow review for publishers. If Adnow updates anything listed above, we will update it. So you can get updated information.

In this review, I have concluded that Adnow is not a scam. Even though there are many people who report Adnow scam, this network does not fully scam. What I recommend is Give it a try.


A guide on how to run a Quick SEO Audit on your Website
Everyone I mean Everyone wants to learn SEO.
People read blogs, watch videos and begin it up but exactly don't know where to begin from.

Generally, a complete SEO Audit takes hours or it may even take days depending upon the size of the site and its type.

But As time is money and what if you can complete a task of a day in a few hours.

I'm sure you're probably gonna say yes and why not Everyone wants to save time.


Here are a few steps you need to follow to run a quick SEO Audit on your site.


#STEP 1 TO RUN A QUICK SEO AUDIT: Page Speed Insights


Would you prefer to stay on a website that takes minutes to load? NO, right.

Event the google doesn't like such sights that take time to load and therefore Loading speed is important when you talk about optimising it for the search engines.

To check the page speed you simply need to log on to  https://developers.google.com/speed/pagespeed/insights/

Enter your URL see what you've sown in the website.

It shows you results for both desktop and Mobile and also shows the benchmarks

A guide on how to run a Quick SEO Audit on your Website

I took Google as an example and you can see that even the mobile loading speed for Google is 89 which means there is still scope for improvement and the benchmark score for mobile is


  • 0-49: slow
  • 50-89: Average
  • 90-100: Fast


A guide on how to run a Quick SEO Audit on your Website

For desktop Google's speed is fast and the score is 100 which is best.

The benchmark score for desktop is the same as Mobile. 

Remember fastest the loading speed lesser the bounce rate. If a user bounces back even before the sight is loaded it is not a good sign for your site.

I always use page speed insights whenever I run a Quick SEO Audit on the sites I work on.


#Number2: Dead Links/Broken Links:


How often you click on a link and it takes you nowhere or shows Error 404. it happens most of the times with sites which are not properly developed and optimized and google doesn't like such sites. 


The links that take you nowhere or land on Error 404 page are called dead links and broken links. though both are different we will talk about these later someday. 


It is significant for a website that every link redirects you either on a page or a site (depending upon the link and content). 


There are a lot of tools on Google which can be used to check the dead links.


The one which I commonly use for detecting dead links while conducting a Quick SEO Audit is 


What I like about this tool is you can detect dead links of the entire site or maybe just a single page. 

It shows you the total number of links scanned, how many out of the total are okay/working and how many of them are dead or broken. 

A guide on how to run a Quick SEO Audit on your Website


There should be no broken links or dead links at all. A developer has to be very careful while putting and redirecting all the links. 

You can even see the full report of the scan and can check the source where it is linked from and the, of course, the URL. 


#Number 3: CSS Minification Test:

Not talking about the technical things and what is CSS and How does it affect Optimisation I'd prefer to tell you about what happens if CSS is not minified. 

If the CSS of your site is not minified it will result in more loading time. The weight of your CSS is directly proportional to the loading time of your site.

I use SEOsitecheckup for this. though its a paid tool you can run a 1-2 tests for free. 

A guide on how to run a Quick SEO Audit on your Website

The score it shows should be maximum. Here in the image its 51 which is not considered as a good score. 

Every piece of CSS must be minimised for making a site SEO friendly.

#Number 4: Title and Heading Test:

To make a site recognizable for search engines and tell what the site is about it is of paramount importance that one should put heading tags, title, meta title and meta keywords appropriately. 

To check whether the headings and titles have been put or not you can use various free tools and the one which I am currently using is SEO QUAKE. 

By adding this extension to our browser you get to see the detailed diagnosis report of the page/site.

A guide on how to run a Quick SEO Audit on your Website

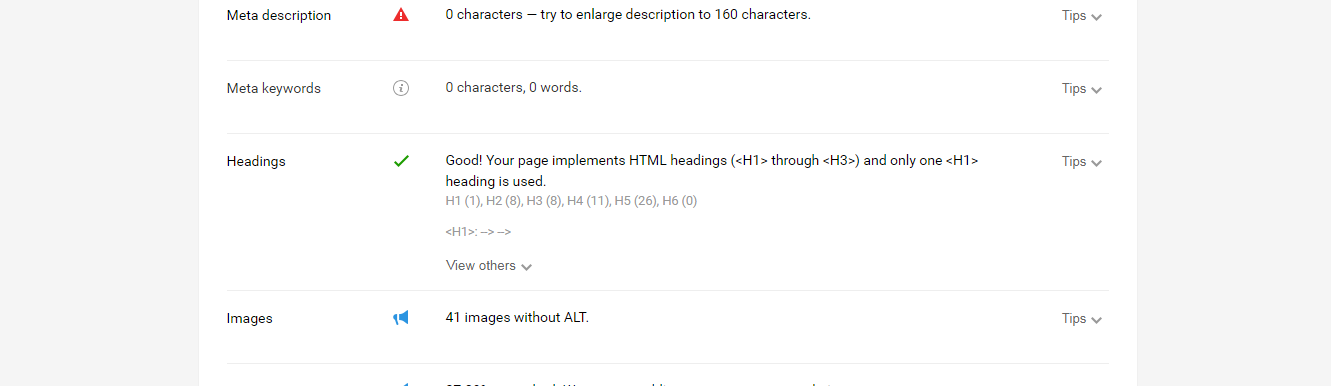
What you get from this tool?

  • Title: Title is one of the most important things, you need to put on your site.
  • Meta Description: meta description is the content below the title shown on the search engines. It is important to have a good and user-relevant meta description.
  • Headings:  Headings are HTML header tags in which your keywords can be placed.  


A guide on how to run a Quick SEO Audit on your Website

SEO Quake is one of the best tools I've found so far for a QUICK SEO AUDIT


What I find most useful in this tool is that it gives you useful tips for each and everything. 

A guide on how to run a Quick SEO Audit on your Website


Now, all that you need to do is,  hop on to the website you're looking to run a quick SEO audit on and prepare a document for the results and start working on them.


To know more about SEO subscribe to our newsletter.


A GUIDE ON HOW TO RUN A QUICK SEO AUDIT ON YOUR WEBSITE

A GUIDE ON HOW TO RUN A QUICK SEO AUDIT ON YOUR WEBSITE

A guide on how to run a Quick SEO Audit on your Website
Everyone I mean Everyone wants to learn SEO.
People read blogs, watch videos and begin it up but exactly don't know where to begin from.

Generally, a complete SEO Audit takes hours or it may even take days depending upon the size of the site and its type.

But As time is money and what if you can complete a task of a day in a few hours.

I'm sure you're probably gonna say yes and why not Everyone wants to save time.


Here are a few steps you need to follow to run a quick SEO Audit on your site.


#STEP 1 TO RUN A QUICK SEO AUDIT: Page Speed Insights


Would you prefer to stay on a website that takes minutes to load? NO, right.

Event the google doesn't like such sights that take time to load and therefore Loading speed is important when you talk about optimising it for the search engines.

To check the page speed you simply need to log on to  https://developers.google.com/speed/pagespeed/insights/

Enter your URL see what you've sown in the website.

It shows you results for both desktop and Mobile and also shows the benchmarks

A guide on how to run a Quick SEO Audit on your Website

I took Google as an example and you can see that even the mobile loading speed for Google is 89 which means there is still scope for improvement and the benchmark score for mobile is


  • 0-49: slow
  • 50-89: Average
  • 90-100: Fast


A guide on how to run a Quick SEO Audit on your Website

For desktop Google's speed is fast and the score is 100 which is best.

The benchmark score for desktop is the same as Mobile. 

Remember fastest the loading speed lesser the bounce rate. If a user bounces back even before the sight is loaded it is not a good sign for your site.

I always use page speed insights whenever I run a Quick SEO Audit on the sites I work on.


#Number2: Dead Links/Broken Links:


How often you click on a link and it takes you nowhere or shows Error 404. it happens most of the times with sites which are not properly developed and optimized and google doesn't like such sites. 


The links that take you nowhere or land on Error 404 page are called dead links and broken links. though both are different we will talk about these later someday. 


It is significant for a website that every link redirects you either on a page or a site (depending upon the link and content). 


There are a lot of tools on Google which can be used to check the dead links.


The one which I commonly use for detecting dead links while conducting a Quick SEO Audit is 


What I like about this tool is you can detect dead links of the entire site or maybe just a single page. 

It shows you the total number of links scanned, how many out of the total are okay/working and how many of them are dead or broken. 

A guide on how to run a Quick SEO Audit on your Website


There should be no broken links or dead links at all. A developer has to be very careful while putting and redirecting all the links. 

You can even see the full report of the scan and can check the source where it is linked from and the, of course, the URL. 


#Number 3: CSS Minification Test:

Not talking about the technical things and what is CSS and How does it affect Optimisation I'd prefer to tell you about what happens if CSS is not minified. 

If the CSS of your site is not minified it will result in more loading time. The weight of your CSS is directly proportional to the loading time of your site.

I use SEOsitecheckup for this. though its a paid tool you can run a 1-2 tests for free.


A guide on how to run a Quick SEO Audit on your Website

The score it shows should be maximum. Here in the image its 51 which is not considered as a good score. 

Every piece of CSS must be minimised for making a site SEO friendly.

#Number 4: Title and Heading Test:

To make a site recognizable for search engines and tell what the site is about it is of paramount importance that one should put heading tags, title, meta title and meta keywords appropriately. 

To check whether the headings and titles have been put or not you can use various free tools and the one which I am currently using is SEO QUAKE. 

By adding this extension to our browser you get to see the detailed diagnosis report of the page/site.

A guide on how to run a Quick SEO Audit on your Website

What you get from this tool?

  • Title: Title is one of the most important things, you need to put on your site.
  • Meta Description: meta description is the content below the title shown on the search engines. It is important to have a good and user-relevant meta description.
  • Headings:  Headings are HTML header tags in which your keywords can be placed.  


A guide on how to run a Quick SEO Audit on your Website

SEO Quake is one of the best tools I've found so far for a QUICK SEO AUDIT


What I find most useful in this tool is that it gives you useful tips for each and everything. 

A guide on how to run a Quick SEO Audit on your Website


Now, all that you need to do is,  hop on to the website you're looking to run a quick SEO audit on and prepare a document for the results and start working on them.


To know more about SEO subscribe to our newsletter.